![]()
![]()
Dashboard:Desktop version
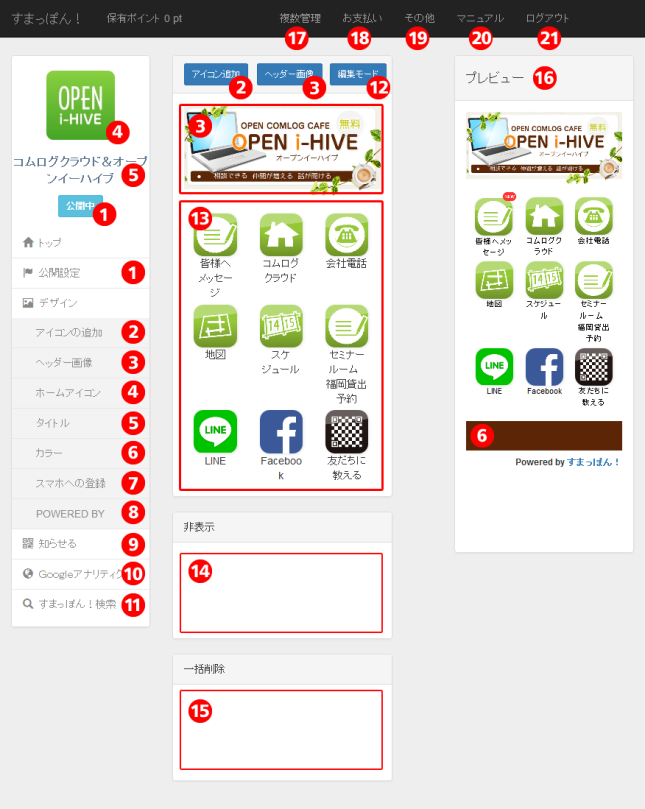
1.Privacy settings
You can switch your “Smappon!” open or close to public here, or change password.
2.Edit icons
You can edit or add new ones.
3.Header banner
You can set the header banner of your Smappon!’s page.
Users will find the page’s title if you haven’t upload any header image.
4.Home icon
You can set an icon to show on the home screen of your smartphone when your customers registered your Smappon! on bookmark.
5.Home title
You can set the header banner of your Smappon!’s page.
Users will find the page’s title if you haven’t upload any header image.
6.Color settings
You can select a base color for your Smappon!
Color settings will be reflected on the background of the header text without banner image and of the footer area.
7.Register on smartphone
Settings for guidance to your customers: how to register a Smappon!’s page as a bookmark on the smartphone’s home screen.
8.POWERED BY
You can put the phrase “Powered by”.
9.Tell a friend about Smappon!
You can share your Smappon! URL via twitter, Facebook, LINE or e-mail.
10.Google analytics settings
Set your Google analytics tracking ID and receive notification about your traffic analysis.
11.Serch “Smappon!”
Your Smappon!’s page can be listed on the Smappon! portal.
Check here for the Smappon portal site!
12.Customizing mode
You only need to drag icons to rearrange them. To finish the customize mode, just click (or tap) “confirm” button on the same position.
13.Icons area
You can arrange here which icons to be shown on your Smappon!. You can change icon images or edit links clicking your icon.
14.Private icons area
If you have put some icons you don’t want to show, all of them will be turned to private temporarily.
15.Delete icons area
You can delete icons by putting them on this side in customizing mode (Icons will be deleted when you confirm the customizing result).
16.Preview mode (only for the desktop version)
You can check preview on your smartphone display from the desktop device.
17.Multiple Smappon! accounts management
You can create more than one Smappon!’s page with single account (using the same e-mail). New Smappon! accounts can be charged day by day (the cost is 10 point per day)
18.Payment
You can charge Smappon! points and check your purchase history here.
[Top-up your points]
View point balance or top-up points here.
※Point purchase system is applied for the Smappon! payment
You have to purchase points in advance to pay monthly fee Smappon! monthly fee
[Point balance]
View point purchase and transaction history.
[One-time payment]
You can pay for all accounts you have at once (even if you have registered them with different e-mail accounts).
19.Other
Update your account settings or withdraw.
[Change your e-mail account]
You can change your e-mail account. An automatic e-mail will be delivered to the new e-mail account for confirmation.
Your e-mail settings will not be changed if you don’t click the confirmation link from the automatic mail.
[Password settings]
You can update your password.
[Withdrawal]
You can withdraw your Smappon! service (delete Smappon! page).
After your cancellation of the membership, all the data will be deleted.
If you have more than one Smappon!’s account, all your Smappon! pages will be deleted.
※Purchased points will be eliminated and they can’t be refunded.
Once withdrawal is completed you can’t recover your deleted data.
20.User’s manual
You can refer user’s manual to see instruction to create Smappon! page.
21.Sign out
Sign out from Smappon!
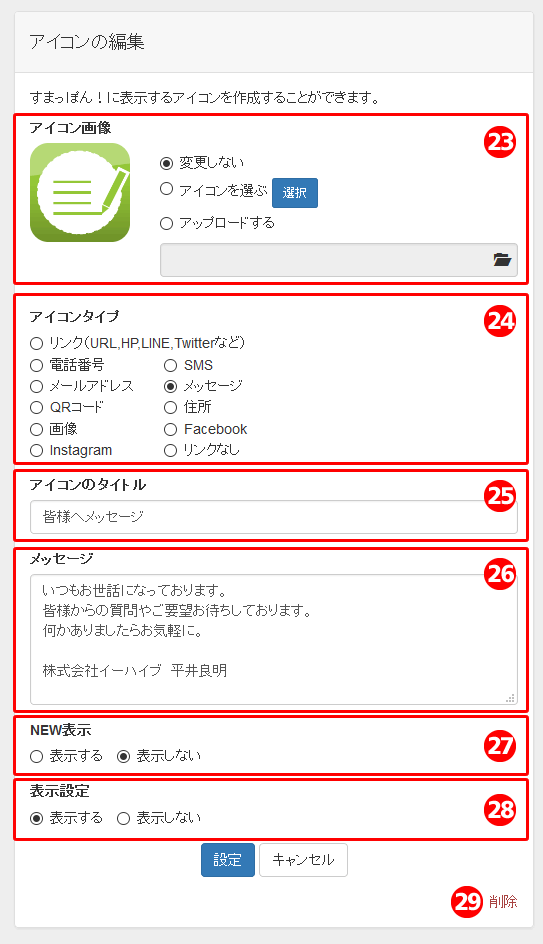
23.Icon images
You can choose or update icons here by selecting an operation from the following three alternatives.
[No update]
Select when you want to leave the current icon without any update.
(This option will not be shown if you are selecting the icon for the first time.)
[Select an icon]
Check if you want to choose one from existing icon’s list.
[Upload an icon]
Select an icon image to upload.
24.Icon type
Select one of the actions from the followings.
[LINK (any kinds of url, website, LINE, Twitter, etc.)]
If you want to put a website’ s link, LINE or Twitter on the icon.
[Phone number]
Customers can call you by clicking the icon with a phone number.
[SMS]
Customers can send a SMS message to the telephone number you registered on the icon.
[E-mail address]
Your customers can send an e-mail you by clicking the icon.
[Messages]
Leave and show text messages to your customers.
[QR code]
Show QR code of your Smappon! by clicking the icon.
[Address]
Show an access map tapping the icon.
[Images]
You can upload an image to show by clicking the icon.
[Facebook]
Put a link to your Facebook account or Facebook page.
[Instagram]
Put a link to your Instagram account.
[No link]
Leave as just an icon (nothing will happen if clicking).
25.Icon title
Insert a title to show under the icon.
26.Action box (The contents will be changed depending on the selected icon).
Put information on the icon.
The contents to put will be changed depending on the selected icon.
(You can find the action box for text message in the sample image).
27.Display NEW
You can display a “new” label on icons with updates.
28.Icons visibility settings
Turn an icon public or private.
29.Delete
Delete icons clicking here.

Menu